жҲ‘жӯЈеңЁе°қиҜ•дҪҝз”ЁдёҖдёӘеё§зј“еҶІеҜ№иұЎпјҢжҲ‘ж— жі•жҺ§еҲ¶е®ғжҳҜеҰӮдҪ•и®ҫзҪ®зҡ„гҖӮеӣ жӯӨпјҢжҲ‘жӯЈеңЁеҲӣе»әдёҖдёӘе…·жңүж·ұеәҰзҡ„еұҸ幕еӨ–fboжқҘз»ҳеҲ¶жҲ‘зҡ„зә№зҗҶгҖӮ然еҗҺе°Ҷе…¶з»ҳеҲ¶еҲ°дё»её§зј“еҶІеҢәгҖӮжҲ‘жӯЈеӨ„дәҺеҸҜд»ҘдҪҝз”ЁOpenGLжҺўжөӢеҷЁд»Һиө„жәҗдёӯзңӢеҲ°зә№зҗҶзҡ„йӮЈдёҖзӮ№пјҢдҪҶжҲ‘дјјд№Һж— жі•е°Ҷе…¶з»ҳеҲ¶еҲ°дё»её§зј“еҶІеҢәгҖӮ
иҝҷжҳҜжҲ‘зҡ„д»Јз Ғ
GLsizei glSizeWidthEquiv = width;
        GLsizei glSizeHeightEquiv = height;

        GLint originalFramebuffer;
        glGetIntegerv(GL_FRAMEBUFFER_BINDING, &originalFramebuffer);

        if(fbo == 0){
            glGenFramebuffers(1, &fbo);
        }
        glBindFramebuffer(GL_FRAMEBUFFER, fbo);

        //Creating texture for framebuffer
        if(texColorBuffer == 0){
            glGenTextures(1, &texColorBuffer);
        }
        glBindTexture([outTex target], texColorBuffer);
        //Having it as null means the texture's data will be created dynamically
        //Using RGBA since the alpha layer is going to be needed
        glTexImage2D([outTex target], 0, GL_RGBA_FLOAT16_APPLE, glSizeWidthEquiv, glSizeHeightEquiv, 0, GL_RGBA, GL_UNSIGNED_BYTE, NULL);

        glTexParameteri([outTex target], GL_TEXTURE_MIN_FILTER, GL_LINEAR);
        glTexParameteri([outTex target], GL_TEXTURE_MAG_FILTER, GL_LINEAR);
        //Attach texture to framebuffer
        glFramebufferTexture2D(GL_FRAMEBUFFER, GL_COLOR_ATTACHMENT0, [outTex target], texColorBuffer, 0);

        //Creating render buffer
        if(renderBuffer == 0){
            glGenRenderbuffers(1, &renderBuffer);
        }
        glBindRenderbuffer(GL_RENDERBUFFER, renderBuffer);
        glRenderbufferStorage(GL_RENDERBUFFER, GL_DEPTH24_STENCIL8, glSizeWidthEquiv, glSizeHeightEquiv);

        //Binding the renderbuffer to the framebuffer
        glFramebufferRenderbuffer(GL_FRAMEBUFFER, GL_DEPTH_STENCIL_ATTACHMENT, GL_RENDERBUFFER, renderBuffer);

        //Check framebuffer
        if(glCheckFramebufferStatus(GL_FRAMEBUFFER) != GL_FRAMEBUFFER_COMPLETE){
            NSLog(@"Framebuffer incomplete noob\n");
        }else{
            NSLog(@"Framebuffer COMPLETE!\n");
        }
        //Start to use the frame buffer
        glBindFramebuffer(GL_FRAMEBUFFER, fbo);
        glViewport(0, 0, glSizeWidthEquiv, glSizeHeightEquiv);
        //cleaning texture: cleaning code here

        //initating glTex0
        glActiveTexture(GL_TEXTURE0);

        //setting up texture stuff
        glClear(GL_COLOR_BUFFER_BIT | GL_DEPTH_BUFFER_BIT);
                    glClearColor(0, 0, 0, 1);
        glDisable(GL_CULL_FACE);

        glColor3f(1,0,0);


        glBegin(GL_QUADS);
        //box 1 in front
        glVertex3f(0, 0, 0);
        glVertex3f(500, 0, 0);
        glVertex3f(500, 500, 0);
        glVertex3f(0, 500, 0);

        //box 2 at the back
        glColor3f(0, 1, 0);
        glVertex3f(-250, -250, 50);
        glVertex3f(250, -250, 50);
        glVertex3f(250, 250, 50);
        glVertex3f(-250, 250, 50);
        glEnd();

        glFogCoordf(9);
        //End of framebuffer usage
        glBindFramebuffer(GL_FRAMEBUFFER, originalFramebuffer);
        glViewport(0, 0, (GLsizei)[outTex width], (GLsizei)[outTex height]);
        [self glGetError];

        glActiveTexture(GL_TEXTURE0);
        glBindTexture([outTex target], texColorBuffer);
        glCopyTexSubImage2D([outTex target], 0, 0, 0, 0, 0, glSizeWidthEquiv, glSizeHeightEquiv);


        glFlush();
зЁӢеәҸзҡ„иҝҷдёҖйғЁеҲҶдҪҚдәҺжёІжҹ“йғЁеҲҶпјҢжҲ‘еңЁеҲқе§ӢеҢ–ж—¶е°ҶfboпјҢrenderBufferе’ҢtexColorBufferи®ҫзҪ®дёә0пјҢд»ҘйҳІжӯўе®ғз”ҹжҲҗж–°зҡ„зј“еҶІеҢәгҖӮ
жүҖд»Ҙеҹәжң¬дёҠжҲ‘еҲӣе»әзј“еҶІеҢәзӣҙеҲ°е®ғе®ҢжҲҗпјҢ然еҗҺйҮҚж–°з»‘е®ҡжҲ‘еҲӣе»әзҡ„fboжқҘз»ҳеҲ¶жҲ‘зҡ„еҪўзҠ¶гҖӮеҲҮжҚўеӣһеҺҹжқҘзҡ„fbo并е°қиҜ•з»ҳеҲ¶е®ғгҖӮ
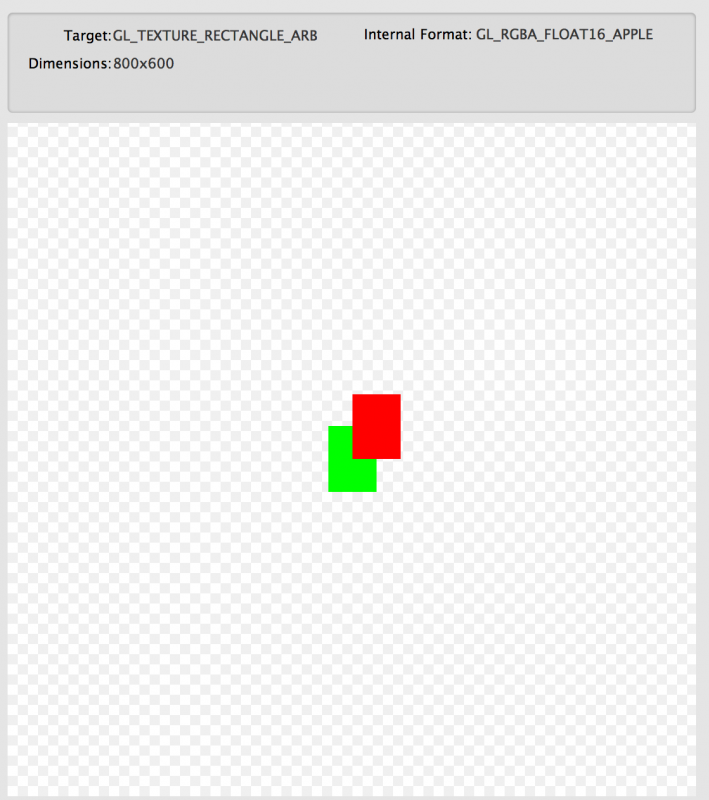
жӯӨеӨ„дҪҝз”Ёзҡ„[outTexзӣ®ж Ү]дёәGL_TEXTURE_RECTANGLE_ARBгҖӮ
иҝҷе°ұжҳҜжҲ‘еңЁOpenGL Profilerзҡ„зә№зҗҶйғЁеҲҶдёӯжүҖжӢҘжңүзҡ„пјҡ http://img.photobucket.com/albums/v442/ardo/ScreenShot2013-10-27at112742PM.png
@GMasucci
жҲ‘дёҚе®Ңе…ЁзЎ®е®ҡиҝҷжҳҜеҗҰжҳҜеҲӣе»әsscceзҡ„жӯЈзЎ®ж–№жі•пјҢдҪҶиҝҷйҮҢжңүдёҖдёӘжҳ“дәҺеӨҚеҲ¶зІҳиҙҙзҡ„д»Јз ҒпјҢеҢ…жӢ¬еә“пјҢGLUTе’ҢOpenGLгҖӮ иҝҷйҮҢдҪҝз”Ёзҡ„д»Јз ҒжҳҜд»Һwww.videotutorialsrock.comз…§жҳҺиҜҫзЁӢдёӯжҚҺеёҰзҡ„пјҢиҝҷж ·жҲ‘е°ұжңүдәҶзұ»дјјзҡ„зҺҜеўғгҖӮ
#include <iostream>
#include <stdlib.h>

#ifdef __APPLE__
#include <OpenGL/OpenGL.h>
#include <GLUT/glut.h>
#else
#include <GL/glut.h>
#endif

using namespace std;

GLuint fbo,texColorBuffer,renderBuffer;
float  camMatrix [4][4];
//Initializes 3D rendering
void initRendering() {
    glEnable(GL_DEPTH_TEST);

}

//Called when the window is resized
void handleResize(int w, int h) {
    glViewport(0, 0, w, h);
glMatrixMode(GL_PROJECTION);
glLoadIdentity();
gluPerspective(45.0, (double)w / (double)h, 1.0, 200.0);
}

//Draws the 3D scene
void drawScene() {
glClear(GL_COLOR_BUFFER_BIT | GL_DEPTH_BUFFER_BIT);

glMatrixMode(GL_MODELVIEW);
glLoadIdentity();

glTranslatef(0.0f, 0.0f, -8.0f);


if(fbo == 0){
    glGenFramebuffers(1, &fbo);
}
glBindFramebuffer(GL_FRAMEBUFFER, fbo);

if(texColorBuffer == 0){
    glGenTextures(1, &texColorBuffer);
}
glBindTexture(GL_TEXTURE_2D, texColorBuffer);
glTexImage2D(GL_TEXTURE_2D, 0, GL_RGBA, 400, 400, 0, GL_RGBA, GL_UNSIGNED_BYTE, 0);
glTexParameteri(GL_TEXTURE_2D, GL_TEXTURE_MIN_FILTER, GL_LINEAR);
glTexParameteri(GL_TEXTURE_2D, GL_TEXTURE_MAG_FILTER, GL_LINEAR);
glFramebufferTexture2D(GL_FRAMEBUFFER, GL_COLOR_ATTACHMENT0, GL_TEXTURE_2D, texColorBuffer, 0);

if(renderBuffer == 0){
    glGenRenderbuffers(1, &renderBuffer);
}
glBindRenderbuffer(GL_RENDERBUFFER, renderBuffer);
glRenderbufferStorage(GL_RENDERBUFFER, GL_DEPTH24_STENCIL8, 400, 400);

glFramebufferRenderbuffer(GL_FRAMEBUFFER, GL_DEPTH_STENCIL_ATTACHMENT, GL_RENDERBUFFER, renderBuffer);

if(glCheckFramebufferStatus(GL_FRAMEBUFFER) != GL_FRAMEBUFFER_COMPLETE){
    printf("Error in framebuffer completeness \n");
}
glBindFramebuffer(GL_FRAMEBUFFER, fbo);
glViewport(0, 0, 400, 400);
glClear(GL_COLOR_BUFFER_BIT | GL_DEPTH_BUFFER_BIT);

glActiveTexture(GL_TEXTURE0);

glBegin(GL_QUADS);
glColor3f(1,0,0);
glVertex3f(0, 0, 0);
glVertex3f(200, 0, 0);
glVertex3f(200, 200, 0);
glVertex3f(0, 200, 0);

glColor3f(0, 1, 0);
glVertex3f(-100, -100, -1);
glVertex3f(100, -100, -1);
glVertex3f(100, 100, -1);
glVertex3f(-100, 100, -1);

glEnd();

glFogCoordf(0);
glBindFramebuffer(GL_FRAMEBUFFER, 0);
glViewport(0, 0, (GLsizei)400, (GLsizei)400);

glActiveTexture(GL_TEXTURE0);
glBindTexture(GL_TEXTURE_2D, texColorBuffer);
glCopyTexSubImage2D(GL_TEXTURE_2D, 0, 0, 0, 0, 0, 400, 400);

glutSwapBuffers();
}

void update(int value) {
glutPostRedisplay();
glutTimerFunc(25, update, 0);
}

int main(int argc, char** argv) {
//Initialize GLUT
glutInit(&argc, argv);
glutInitDisplayMode(GLUT_DOUBLE | GLUT_RGB | GLUT_DEPTH);
glutInitWindowSize(400, 400);

//set fbo,texBuffer and renderbuffer to 0
fbo = 0;
texColorBuffer = 0;
renderBuffer = 0;

//Create the window
glutCreateWindow("Lighting - videotutorialsrock.com");
initRendering();

//Set handler functions
glutDisplayFunc(drawScene);
glutReshapeFunc(handleResize);

glutTimerFunc(25, update, 0); //Add a timer

glutMainLoop();
return 0;
}
зӯ”жЎҲ 0 :(еҫ—еҲҶпјҡ0)
д№ӢеүҚд»ҺдёҚдҪҝз”ЁglCopyTexSubImage2DпјҢиҝҷжҳҜжҲ‘еҜ№openglжүӢеҶҢйЎөзҡ„жңҖдҪіи§ЈйҮҠгҖӮ
жқҘиҮӘhttp://www.opengl.org/sdk/docs/man/xhtml/glCopyTexSubImage2D.xml
В Веқ—еј•з”Ё В В glCopyTexSubImage2DжӣҝжҚўдәҢз»ҙзә№зҗҶеӣҫеғҸзҡ„зҹ©еҪўйғЁеҲҶпјҢз«Ӣж–№дҪ“иҙҙеӣҫзә№зҗҶеӣҫеғҸжҲ–дёҖз»ҙж•°з»„зә№зҗҶзҡ„еӨҡдёӘеҲҮзүҮзҡ„зәҝжҖ§йғЁеҲҶпјҢе…¶дёӯеҢ…еҗ«жқҘиҮӘеҪ“еүҚGL_READ_BUFFERзҡ„еғҸзҙ пјҲиҖҢдёҚжҳҜжқҘиҮӘдё»еӯҳеӮЁеҷЁпјҢеҰӮеҗҢglTexSubImage2Dзҡ„жЎҲдҫӢгҖӮпјү
еҗ¬иө·жқҘжӮЁжӯЈеңЁдҪҝз”ЁtexColorBufferжӣҝжҚўoriginalFramebufferдёӯзҡ„еҶ…е®№гҖӮ
жҲ‘е°Ҷеё§зј“еҶІеҜ№иұЎз»ҳеҲ¶еҲ°еұҸ幕зҡ„ж–№ејҸжҳҜдҪҝз”ЁеёҰзә№зҗҶзҡ„е…ЁеұҸеӣӣиҫ№еҪўпјҢеҰӮдёӢжүҖзӨәпјҡ
glClear(GL_COLOR_BUFFER_BIT | GL_DEPTH_BUFFER_BIT);
glClearColor(0, 0, 0, 1);
glPushMatrix();
    GLfloat identity[4][4];
    for (int i=0; i<4; ++i){
        for (int j=0; j<4; ++j){
            identity[i][j] = 0;
        }
    }
    identity[0][0] = identity[1][1] = identity[2][2] = identity[3][3] = 1;
    glMatrixMode(GL_MODELVIEW);
    glLoadMatrixf(identity);
    glMatrixMode(GL_PROJECTION);
    glLoadMatrixf(identity);

    glActiveTexture(GL_TEXTURE0);
    glBindTexture([outTex target], texColorBuffer);

    glBegin(GL_QUADS);
        glVertex2f(-1,-1);
        glTexCoord2f(0, 0);

        glVertex2f( 1,-1);
        glTexCoord2f(1, 0);

        glVertex2f( 1, 1);
        glTexCoord2f(1, 1);

        glVertex2f(-1, 1);
        glTexCoord2f(0, 1);
    glEnd();
glPopMatrix();