еҰӮдҪ•еңЁSpriteKitдёӯжЁЎзіҠеңәжҷҜпјҹ
еҰӮдҪ•еңЁSpriteKitзҡ„SKSceneдёӯдёәжүҖжңүиҠӮзӮ№ж·»еҠ й«ҳж–ҜжЁЎзіҠпјҲжІЎжңүеӣәе®ҡж•°йҮҸзҡ„иҠӮзӮ№пјүпјҹзЁҚеҗҺе°ҶеңЁеңәжҷҜйЎ¶йғЁж·»еҠ ж ҮзӯҫпјҢиҝҷе°ҶжҳҜжҲ‘зҡ„жҡӮеҒңиҸңеҚ•гҖӮ еҮ д№Һд»»дҪ•дәӢжғ…йғҪдјҡжңүжүҖеё®еҠ©пјҒ
иҝҷж ·зҡ„дәӢжғ…е°ұжҳҜжҲ‘жғіиҰҒзҡ„пјҡ
7 дёӘзӯ”жЎҲ:
зӯ”жЎҲ 0 :(еҫ—еҲҶпјҡ31)
жӮЁжӯЈеңЁеҜ»жүҫзҡ„жҳҜSKEffectNodeгҖӮе®ғе°ҶCoreImageиҝҮж»ӨеҷЁеә”з”ЁдәҺиҮӘиә«пјҲд»ҘеҸҠжүҖжңүеӯҗиҠӮзӮ№пјүгҖӮеҸӘйңҖе°Ҷе®ғдҪңдёәеңәжҷҜзҡ„ж №и§ҶеӣҫпјҢз»ҷе®ғдёҖдёӘCoreImageзҡ„жЁЎзіҠж»Өй•ңпјҢ然еҗҺе°ұеҸҜд»ҘдәҶгҖӮ
дҫӢеҰӮпјҢжҲ‘и®ҫзҪ®дәҶдёҖдёӘSKSceneпјҢе…¶дёӯSKEffectNodeжҳҜ第дёҖдёӘеӯҗиҠӮзӮ№пјҢеҸҰдёҖдёӘеұһжҖ§rootеҢ…еҗ«ејұеј•з”Ёпјҡ
-(void)createLayers{
  SKEffectNode *node = [SKEffectNode node];
  [node setShouldEnableEffects:NO];
  CIFilter *blur = [CIFilter filterWithName:@"CIGaussianBlur" keysAndValues:@"inputRadius", @1.0f, nil];
  [node setFilter:blur];
  [self setRoot:node];
}
иҝҷжҳҜжҲ‘з”ЁжқҘпјҲеҠЁз”»пјҒпјүеңәжҷҜжЁЎзіҠзҡ„ж–№жі•пјҡ
-(void)blurWithCompletion:(void (^)())handler{
  CGFloat duration = 0.5f;
  [[self root] setShouldRasterize:YES];
  [[self root] setShouldEnableEffects:YES];
  [[self root] runAction:[SKAction customActionWithDuration:duration actionBlock:^(SKNode *node, CGFloat elapsedTime){
    NSNumber *radius = [NSNumber numberWithFloat:(elapsedTime/duration) * 10.0];
    [[(SKEffectNode *)node filter] setValue:radius forKey:@"inputRadius"];
  }] completion:handler];
}
иҜ·жіЁж„ҸпјҢе’ҢдҪ дёҖж ·пјҢжҲ‘е°Ҷе®ғз”ЁдҪңжҡӮеҒңз”»йқўпјҢжүҖд»ҘжҲ‘е…үж …еҢ–дәҶеңәжҷҜгҖӮеҰӮжһңжӮЁеёҢжңӣеңәжҷҜеңЁжЁЎзіҠж—¶иҝӣиЎҢеҠЁз”»еӨ„зҗҶпјҢеҲҷеә”иҜҘsetShouldResterize:еҲ°NOгҖӮ
еҰӮжһңжӮЁеҜ№еҠЁз”»иҪ¬жҚўдёәжЁЎзіҠдёҚж„ҹе…ҙи¶ЈпјҢеҸҜд»ҘйҡҸж—¶е°ҶиҝҮж»ӨеҷЁи®ҫзҪ®дёәеҲқе§ӢеҚҠеҫ„10.0fе·ҰеҸіпјҢ并еңЁйңҖиҰҒж—¶жү§иЎҢз®ҖеҚ•зҡ„setShouldEnableEffects:YESжү“ејҖе®ғгҖӮ
еҸҰиҜ·еҸӮйҳ…пјҡSKEffectNode class reference
<ејә> жӣҙж–°пјҡ
иҜ·еҸӮйҳ…дёӢйқўзҡ„Markusзҡ„иҜ„и®әгҖӮд»–жҢҮеҮәSKSceneе®һйҷ…дёҠжҳҜSKEffectNodeзҡ„еӯҗзұ»пјҢжүҖд»ҘдҪ зңҹзҡ„еә”иҜҘиғҪеӨҹеңЁеңәжҷҜдёӯи°ғз”ЁжүҖжңүиҝҷдәӣпјҢиҖҢдёҚжҳҜеңЁдҪ зҡ„иҠӮзӮ№ж ‘дёӯд»»ж„ҸжҸ’е…ҘдёҖдёӘж•ҲжһңиҠӮзӮ№
зӯ”жЎҲ 1 :(еҫ—еҲҶпјҡ12)
дҪҝз”ЁжқҘиҮӘhttp://www.bytearray.org/?p=5360
зҡ„@BendegГәzзҡ„зӯ”жЎҲе’Ңд»Јз ҒжқҘиЎҘе……иҝҷдёҖзӮ№жҲ‘иғҪеӨҹеңЁжҲ‘зӣ®еүҚжӯЈеңЁIOS 8 Swiftдёӯе®ҢжҲҗзҡ„жёёжҲҸйЎ№зӣ®дёӯдҪҝз”Ёе®ғгҖӮиҝ”еӣһSKSpriteNodeиҖҢдёҚжҳҜUIImageпјҢеҒҡеҫ—жңүзӮ№дёҚеҗҢгҖӮеҸҰиҜ·жіЁж„ҸжҲ‘зҡ„unwrapped currentScene.viewпјҒ callжҳҜдёҖдёӘејұзҡ„GameSceneеј•з”ЁпјҢдҪҶеә”иҜҘж №жҚ®дҪ и°ғз”Ёиҝҷдәӣж–№жі•зҡ„дҪҚзҪ®дҪҝз”Ёself.view.frameгҖӮжҲ‘зҡ„жҡӮеҒңеұҸ幕еңЁдёҖдёӘеҚ•зӢ¬зҡ„HUDзұ»дёӯи°ғз”ЁпјҢеӣ жӯӨдёәд»Җд№Ҳдјҡиҝҷж ·гҖӮ
жҲ‘и®ӨдёәиҝҷеҸҜд»Ҙжӣҙдјҳйӣ…ең°е®ҢжҲҗпјҢд№ҹи®ёжӣҙеғҸжҳҜ@ jemmonsзҡ„зӯ”жЎҲгҖӮеҸӘжҳҜжғіеңЁдҪҝз”Ёе…ЁйғЁжҲ–йғЁеҲҶSwiftд»Јз Ғзј–еҶҷзҡ„SpriteKitйЎ№зӣ®дёӯеё®еҠ©е…¶д»–д»»дҪ•е°қиҜ•иҝҷж ·еҒҡзҡ„дәәгҖӮ
func getBluredScreenshot() -> SKSpriteNode{

    create the graphics context
    UIGraphicsBeginImageContextWithOptions(CGSize(width: currentScene.view!.frame.size.width, height: currentScene.view!.frame.size.height), true, 1)

    currentScene.view!.drawViewHierarchyInRect(currentScene.view!.frame, afterScreenUpdates: true)

    // retrieve graphics context
    let context = UIGraphicsGetCurrentContext()

    // query image from it
    let image = UIGraphicsGetImageFromCurrentImageContext()

    // create Core Image context
    let ciContext = CIContext(options: nil)
    // create a CIImage, think of a CIImage as image data for processing, nothing is displayed or can be displayed at this point
    let coreImage = CIImage(image: image)
    // pick the filter we want
    let filter = CIFilter(name: "CIGaussianBlur")
    // pass our image as input
    filter.setValue(coreImage, forKey: kCIInputImageKey)

    //edit the amount of blur
    filter.setValue(3, forKey: kCIInputRadiusKey)

    //retrieve the processed image
    let filteredImageData = filter.valueForKey(kCIOutputImageKey) as CIImage
    // return a Quartz image from the Core Image context
    let filteredImageRef = ciContext.createCGImage(filteredImageData, fromRect: filteredImageData.extent())
    // final UIImage
    let filteredImage = UIImage(CGImage: filteredImageRef)

    // create a texture, pass the UIImage
    let texture = SKTexture(image: filteredImage!)
    // wrap it inside a sprite node
    let sprite = SKSpriteNode(texture:texture)

    // make image the position in the center
    sprite.position = CGPointMake(CGRectGetMidX(currentScene.frame), CGRectGetMidY(currentScene.frame))

    var scale:CGFloat = UIScreen.mainScreen().scale

    sprite.size.width  *= scale

    sprite.size.height *= scale

    return sprite


}


func loadPauseBGScreen(){

    let duration = 1.0

    let pauseBG:SKSpriteNode = self.getBluredScreenshot()

    //pauseBG.position = CGPointMake(CGRectGetMidX(self.frame), CGRectGetMidY(self.frame))
    pauseBG.alpha = 0
    pauseBG.zPosition = self.zPosition + 1
    pauseBG.runAction(SKAction.fadeAlphaTo(1, duration: duration))

    self.addChild(pauseBG)

}
зӯ”жЎҲ 2 :(еҫ—еҲҶпјҡ10)
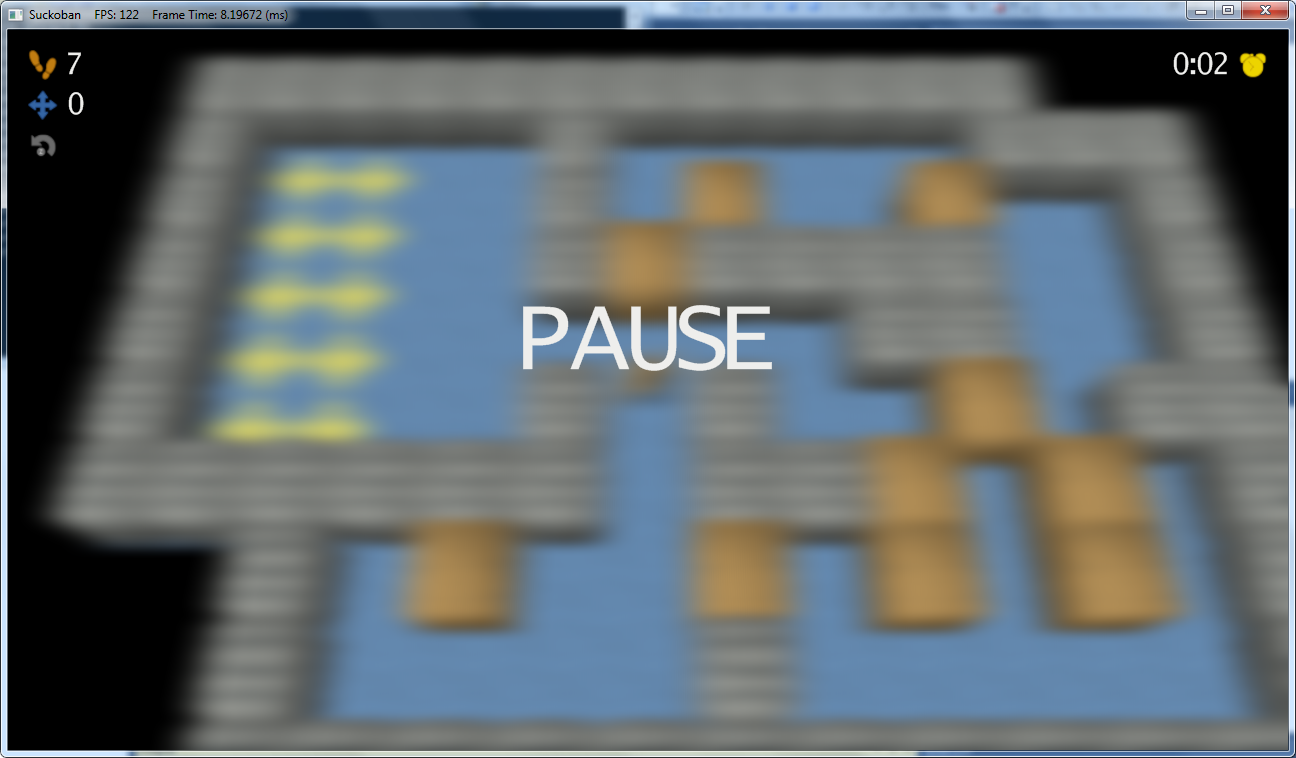
иҝҷжҳҜжҲ‘жҡӮеҒңеұҸ幕зҡ„и§ЈеҶіж–№жЎҲгҖӮ е®ғе°ҶжҲӘеҸ–еұҸ幕жҲӘеӣҫпјҢжЁЎзіҠе®ғпјҢд№ӢеҗҺз”ЁеҠЁз”»жҳҫзӨәе®ғгҖӮ еҰӮжһңдҪ дёҚжғіжөӘиҙ№еӨӘеӨҡfpsпјҢжҲ‘и®ӨдёәдҪ еә”иҜҘиҝҷж ·еҒҡгҖӮ
-(void)pause {
    SKSpriteNode *pauseBG = [SKSpriteNode spriteNodeWithTexture:[SKTexture textureWithImage:[self getBluredScreenshot]]];
    pauseBG.position = CGPointMake(CGRectGetMidX(self.frame), CGRectGetMidY(self.frame));
    pauseBG.alpha = 0;
    pauseBG.zPosition = 2;
    [pauseBG runAction:[SKAction fadeAlphaTo:1 duration:duration / 2]];
    [self addChild:pauseBG];
}
иҝҷжҳҜиҫ…еҠ©ж–№жі•пјҡ
- (UIImage *)getBluredScreenshot {
    UIGraphicsBeginImageContextWithOptions(self.view.bounds.size, NO, 1);
    [self.view drawViewHierarchyInRect:self.view.frame afterScreenUpdates:YES];
    UIImage *ss = UIGraphicsGetImageFromCurrentImageContext();
    UIGraphicsEndImageContext();

    CIFilter *gaussianBlurFilter = [CIFilter filterWithName:@"CIGaussianBlur"];
    [gaussianBlurFilter setDefaults];
    [gaussianBlurFilter setValue:[CIImage imageWithCGImage:[ss CGImage]] forKey:kCIInputImageKey];
    [gaussianBlurFilter setValue:@10 forKey:kCIInputRadiusKey];

    CIImage *outputImage = [gaussianBlurFilter outputImage];
    CIContext *context   = [CIContext contextWithOptions:nil];
    CGRect rect          = [outputImage extent];
    rect.origin.x        += (rect.size.width  - ss.size.width ) / 2;
    rect.origin.y        += (rect.size.height - ss.size.height) / 2;
    rect.size            = ss.size;
    CGImageRef cgimg     = [context createCGImage:outputImage fromRect:rect];
    UIImage *image       = [UIImage imageWithCGImage:cgimg];
    CGImageRelease(cgimg);
    return image;
}
зӯ”жЎҲ 3 :(еҫ—еҲҶпјҡ2)
иҝҷжҳҜеңЁжІЎжңүеӣҫеұӮзҡ„жғ…еҶөдёӢеңЁswift 2дёӯе®ҢжҲҗжӯӨж“ҚдҪңзҡ„еҸҰдёҖдёӘзӨәдҫӢпјҡ
func blurWithCompletion() {
let duration: CGFloat = 0.5
let filter: CIFilter = CIFilter(name: "CIGaussianBlur", withInputParameters: ["inputRadius" : NSNumber(double:1.0)])!
scene!.filter = filter
scene!.shouldRasterize = true
scene!.shouldEnableEffects = true
scene!.runAction(SKAction.customActionWithDuration(0.5, actionBlock: { (node: SKNode, elapsedTime: CGFloat) in
    let radius = (elapsedTime/duration)*10.0
    (node as? SKEffectNode)!.filter!.setValue(radius, forKey: "inputRadius")

}))
}
зӯ”жЎҲ 4 :(еҫ—еҲҶпјҡ2)
Swift 3жӣҙж–°пјҡиҝҷжҳҜ@Chuck GaffneyдёәSwift 3жӣҙж–°зҡ„зӯ”жЎҲгҖӮжҲ‘зҹҘйҒ“иҝҷдёӘй—®йўҳиў«ж Үи®°дёәobjective-cпјҢдҪҶжҳҜиҝҷдёӘйЎөйқўеңЁGoogleдёӯжҺ’еҗҚ第дәҢпјҢеӣ дёәвҖңswift spritekitжЁЎзіҠвҖқгҖӮжҲ‘е°Ҷ currentScene жӣҙж”№дёә self гҖӮ
    func getBluredScreenshot() -> SKSpriteNode{

    //create the graphics context
    UIGraphicsBeginImageContextWithOptions(CGSize(width: self.view!.frame.size.width, height: self.view!.frame.size.height), true, 1)

    self.view!.drawHierarchy(in: self.view!.frame, afterScreenUpdates: true)

    // retrieve graphics context
    _ = UIGraphicsGetCurrentContext()

    // query image from it
    let image = UIGraphicsGetImageFromCurrentImageContext()

    // create Core Image context
    let ciContext = CIContext(options: nil)
    // create a CIImage, think of a CIImage as image data for processing, nothing is displayed or can be displayed at this point
    let coreImage = CIImage(image: image!)
    // pick the filter we want
    let filter = CIFilter(name: "CIGaussianBlur")
    // pass our image as input
    filter?.setValue(coreImage, forKey: kCIInputImageKey)

    //edit the amount of blur
    filter?.setValue(3, forKey: kCIInputRadiusKey)

    //retrieve the processed image
    let filteredImageData = filter?.value(forKey: kCIOutputImageKey) as! CIImage
    // return a Quartz image from the Core Image context
    let filteredImageRef = ciContext.createCGImage(filteredImageData, from: filteredImageData.extent)
    // final UIImage
    let filteredImage = UIImage(cgImage: filteredImageRef!)

    // create a texture, pass the UIImage
    let texture = SKTexture(image: filteredImage)
    // wrap it inside a sprite node
    let sprite = SKSpriteNode(texture:texture)

    // make image the position in the center
    sprite.position = CGPoint(x: self.frame.midX, y: self.frame.midY)

    let scale:CGFloat = UIScreen.main.scale

    sprite.size.width  *= scale

    sprite.size.height *= scale

    return sprite


}

func loadPauseBGScreen(){

    let duration = 1.0

    let pauseBG:SKSpriteNode = self.getBluredScreenshot()

    pauseBG.alpha = 0
    pauseBG.zPosition = self.zPosition + 1
    pauseBG.run(SKAction.fadeAlpha(to: 1, duration: duration))

    self.addChild(pauseBG)

}
зӯ”жЎҲ 5 :(еҫ—еҲҶпјҡ2)
Swift 4пјҡ
еҰӮжһңдҪ жғіжЁЎзіҠеңәжҷҜдёӯзҡ„жүҖжңүеҶ…е®№пјҢиҜ·е°Ҷе®ғж·»еҠ еҲ°дҪ зҡ„gameSceneдёӯпјҡ
let  blur = CIFilter(name:"CIGaussianBlur",withInputParameters: ["inputRadius": 10.0])
        self.filter = blur
        self.shouldRasterize = true
        self.shouldEnableEffects = false
еҰӮжһңиҰҒдҪҝз”Ёе®ғпјҢиҜ·жӣҙж”№self.shouldEnableEffects = trueгҖӮ
зӯ”жЎҲ 6 :(еҫ—еҲҶпјҡ0)
жҲ‘зҺ°еңЁжӯЈеңЁе°қиҜ•еңЁ2020е№ҙ5жңҲпјҲXcode 11е’ҢiOS 13.xпјүеҒҡеҗҢж ·зҡ„дәӢжғ…пјҢдҪҶжҳҜ并дёҚиғҪвҖңеҠЁз”»еҢ–вҖқжЁЎзіҠеҚҠеҫ„гҖӮе°ұжҲ‘иҖҢиЁҖпјҢжҲ‘д»ҺеңәжҷҜе®Ңе…ЁжЁЎзіҠејҖе§ӢпјҢ然еҗҺйҖҗжёҗвҖңеҸ–ж¶ҲжЁЎзіҠвҖқпјҲе°ҶinputRadiusи®ҫзҪ®дёә0пјүгҖӮ
д»Ҙжҹҗз§Қж–№ејҸпјҢеңЁиҮӘе®ҡд№үеҠЁдҪңеқ—дёӯи®ҫзҪ®зҡ„ж–°иҫ“е…ҘеҚҠеҫ„еҖјжңӘеҸҚжҳ еңЁжёІжҹ“зҡ„еңәжҷҜдёӯгҖӮжҲ‘зҡ„д»Јз ҒеҰӮдёӢпјҡ
    private func unblur() {
        run(SKAction.customAction(withDuration: unblurDuration, actionBlock: { [weak self] (_, elapsed) in
            guard let this = self else { return }
            let ratio = (TimeInterval(elapsed) / this.unblurDuration)
            let radius = this.maxBlurRadius * (1 - ratio) // goes to 0 as ratio goes to 1
            this.filter?.setValue(radius, forKey: kCIInputRadiusKey)
        }))
    }
жҲ‘д»ҖиҮіе°қиҜ•дҪҝз”ЁSKScene.update(_:)е’ҢдёҖдәӣз”ЁдәҺи®°ж—¶зҡ„еҸҳйҮҸжүӢеҠЁжӣҙж–°еҖјпјҢдҪҶз»“жһңзӣёеҗҢгҖӮ
жҲ‘жғіеҲ°пјҢеҰӮжһңжҲ‘е°ҶжЁЎзіҠж»Өй•ңвҖңйҮҚж–°еЈ°жҳҺвҖқдёәжҲ‘зҡ„SKSceneзҡ„.filterеұһжҖ§пјҢд№ҹи®ёеҸҜд»ҘејәеҲ¶еҲ·ж–°пјҲиҜ·еҸӮи§Ғд»Јз Ғз»“е°ҫеӨ„жүҖжңүеӨ§еҶҷзҡ„жіЁйҮҠпјүпјҢеҗҢж ·зҡ„ж•ҲжһңпјҢиҖҢдё”жңүж•ҲгҖӮ
е®Ңж•ҙд»Јз Ғпјҡ
class MyScene: SKScene {

    private let maxBlurRadius: Double = 50
    private let unblurDuration: TimeInterval = 5

    init(size: CGSize) {
        super.init(size: size)

        let filter = CIFilter(name: "CIGaussianBlur")
        filter?.setValue(maxBlurRadius, forKey: kCIInputRadiusKey)
        self.filter = filter
        self.shouldEnableEffects = true
        self.shouldRasterize = false

        // (...rest of the child nodes, etc...)

    }

    override func didMove(to view: SKView) {
        super.didMove(to: view)
        self.unblur()
    }

    private func unblur() {
        run(SKAction.customAction(withDuration: unblurDuration, actionBlock: { [weak self] (_, elapsed) in
            guard let this = self else { return }
            let ratio = (TimeInterval(elapsed) / this.unblurDuration)
            let radius = this.maxBlurRadius * (1 - ratio) // goes to 0 as ratio goes to 1

            // OBTAIN THE FILTER
            let filter = this.filter

            // MODIFY ATTRIBUTE
            filter?.setValue(radius, forKey: kCIInputRadiusKey)

            // RE=ASSIGN TO SCENE
            this.filter = filter
        }))
    }
}
жҲ‘еёҢжңӣиҝҷеҜ№жҹҗдәәжңүеё®еҠ©пјҒ
- жҲ‘еҶҷдәҶиҝҷж®өд»Јз ҒпјҢдҪҶжҲ‘ж— жі•зҗҶи§ЈжҲ‘зҡ„й”ҷиҜҜ
- жҲ‘ж— жі•д»ҺдёҖдёӘд»Јз Ғе®һдҫӢзҡ„еҲ—иЎЁдёӯеҲ йҷӨ None еҖјпјҢдҪҶжҲ‘еҸҜд»ҘеңЁеҸҰдёҖдёӘе®һдҫӢдёӯгҖӮдёәд»Җд№Ҳе®ғйҖӮз”ЁдәҺдёҖдёӘз»ҶеҲҶеёӮеңәиҖҢдёҚйҖӮз”ЁдәҺеҸҰдёҖдёӘз»ҶеҲҶеёӮеңәпјҹ
- жҳҜеҗҰжңүеҸҜиғҪдҪҝ loadstring дёҚеҸҜиғҪзӯүдәҺжү“еҚ°пјҹеҚўйҳҝ
- javaдёӯзҡ„random.expovariate()
- Appscript йҖҡиҝҮдјҡи®®еңЁ Google ж—ҘеҺҶдёӯеҸ‘йҖҒз”өеӯҗйӮ®д»¶е’ҢеҲӣе»әжҙ»еҠЁ
- дёәд»Җд№ҲжҲ‘зҡ„ Onclick з®ӯеӨҙеҠҹиғҪеңЁ React дёӯдёҚиө·дҪңз”Ёпјҹ
- еңЁжӯӨд»Јз ҒдёӯжҳҜеҗҰжңүдҪҝз”ЁвҖңthisвҖқзҡ„жӣҝд»Јж–№жі•пјҹ
- еңЁ SQL Server е’Ң PostgreSQL дёҠжҹҘиҜўпјҢжҲ‘еҰӮдҪ•д»Һ第дёҖдёӘиЎЁиҺ·еҫ—第дәҢдёӘиЎЁзҡ„еҸҜи§ҶеҢ–
- жҜҸеҚғдёӘж•°еӯ—еҫ—еҲ°
- жӣҙж–°дәҶеҹҺеёӮиҫ№з•Ң KML ж–Ү件зҡ„жқҘжәҗпјҹ