如何在导航抽屉里面创建一个可扩展的listView?
我需要创建一个导航抽屉,如flipkart或Astro文件管理器应用程序。 如何用可扩展的listView替换listView?
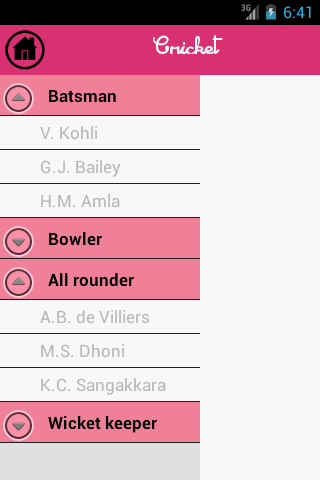
我需要这样的导航抽屉:
这是我的xml:
<LinearLayout xmlns:android="http://schemas.android.com/apk/res/android"
xmlns:tools="http://schemas.android.com/tools"
android:layout_width="match_parent"
android:layout_height="match_parent"
xmlns:app="http://schemas.android.com/apk/res-auto"
android:orientation="vertical"
tools:context=".MainActivity">
<include
    layout="@layout/toolbar"
    android:layout_width="match_parent"
    android:layout_height="wrap_content" />


<!-- This DrawerLayout has two children at the root  -->
<android.support.v4.widget.DrawerLayout
    android:id="@+id/drawer_layout"
    android:layout_width="match_parent"
    android:layout_height="match_parent">

    <!-- This LinearLayout represents the contents of the screen  -->
    <LinearLayout
        android:layout_width="match_parent"
        android:layout_height="match_parent"
        android:orientation="vertical">

        <!-- The main content view where fragments are loaded -->
        <FrameLayout
            android:id="@+id/flContent"
            android:layout_width="match_parent"
            android:layout_height="match_parent" />


    </LinearLayout>
    <!-- The navigation drawer that comes from the left -->
    <!-- Note that `android:layout_gravity` needs to be set to 'start' -->

    <android.support.design.widget.NavigationView
        android:id="@+id/nvView"
        android:layout_width="wrap_content"
        android:layout_height="match_parent"
        android:layout_gravity="start"
        android:background="@android:color/white"
        app:headerLayout="@layout/nav_header"
        android:choiceMode="singleChoice"
        app:menu="@menu/drawer_view" />

</android.support.v4.widget.DrawerLayout>
4 个答案:
答案 0 :(得分:3)
您可以创建ExpandableListView并将其用作NavigationView。 xml结果的一个例子:
<LinearLayout xmlns:android="http://schemas.android.com/apk/res/android"
xmlns:tools="http://schemas.android.com/tools"
android:layout_width="match_parent"
android:layout_height="match_parent"
xmlns:app="http://schemas.android.com/apk/res-auto"
android:orientation="vertical"
tools:context=".MainActivity">

<include
    layout="@layout/toolbar"
    android:layout_width="match_parent"
    android:layout_height="wrap_content" />

<!-- This DrawerLayout has two children at the root  -->
<android.support.v4.widget.DrawerLayout
    android:id="@+id/drawer_layout"
    android:layout_width="match_parent"
    android:layout_height="match_parent">

<!-- This LinearLayout represents the contents of the screen  -->
<LinearLayout
    android:layout_width="match_parent"
    android:layout_height="match_parent"
    android:orientation="vertical">

    <!-- The main content view where fragments are loaded -->
    <FrameLayout
        android:id="@+id/flContent"
        android:layout_width="match_parent"
        android:layout_height="match_parent" />


</LinearLayout>
<!-- The navigation drawer that comes from the left -->
<!-- Note that `android:layout_gravity` needs to be set to 'start' -->

 <ExpandableListView
            android:id="@+id/lvExp"
            android:layout_height="match_parent"
            android:layout_width="match_parent"
            android:layout_gravity="start"/>

</android.support.v4.widget.DrawerLayout>
您可以找到使用ExpandableListView here
的示例答案 1 :(得分:0)
您必须在NavigationDrawer中创建一个ExpandableListView 请关注这些链接并申请 How to create drawer navigation like this? 和 list and expandable list in single drawer 希望这会对你有所帮助
答案 2 :(得分:0)
<android.support.design.widget.NavigationView
    android:id="@+id/nav_view"
    android:layout_width="240dp"
    android:layout_height="match_parent"
    android:layout_gravity="start"
    android:fitsSystemWindows="true"
    app:headerLayout="@layout/nav_header_main"
    app:itemIconTint="@color/colorPrimary"
    app:itemTextAppearance="@style/TextAppearance.AppCompat.Body2">


    <ExpandableListView xmlns:android="http://schemas.android.com/apk/res/android"
        xmlns:tools="http://schemas.android.com/tools"
        android:id="@+id/navigationmenu"
        android:layout_width="wrap_content"
        android:layout_height="wrap_content"
        android:layout_marginBottom="41dp"
        android:layout_marginTop="90dp"
        android:background="@android:color/white"
        android:choiceMode="singleChoice"
        android:dividerHeight="1dp"
        android:groupIndicator="@null"
        android:listSelector="@color/colorAccent" />

    <Button
        android:id="@+id/session_logout"
        android:layout_width="match_parent"
        android:layout_height="40dp"
        android:layout_gravity="bottom"
        android:background="@color/colorPrimary"
        android:text="Logout"
        android:textColor="#fff" />

</android.support.design.widget.NavigationView>
答案 3 :(得分:0)
<?xml version="1.0" encoding="utf-8"?>
<LinearLayout xmlns:android="http://schemas.android.com/apk/res/android"
    android:layout_width="match_parent"
    android:layout_height="match_parent"
    android:background="#FFFFFF"
    android:orientation="vertical">

    <RelativeLayout
        android:layout_width="match_parent"
        android:layout_height="52dp"
        android:background="@color/themeColor"
        android:padding="10dp">

        <ImageView
            android:id="@+id/home"
            android:layout_width="35dp"
            android:layout_height="35dp"
            android:layout_gravity="center_vertical"
            android:layout_marginLeft="5dp"
            android:background="@drawable/menu_icon" />

        <TextView
            android:id="@+id/appname"
            android:layout_width="wrap_content"
            android:layout_height="wrap_content"
            android:layout_marginLeft="15dp"
            android:layout_marginTop="5dp"
            android:layout_toRightOf="@+id/home"
            android:gravity="left|center_vertical"
            android:text="Home"
            android:textColor="#FFFFFF"
            android:textSize="20dp" />

        <ImageView
            android:id="@+id/imageView2"
            android:layout_width="35dp"
            android:layout_height="35dp"
            android:layout_alignParentRight="true"
            android:layout_centerVertical="true"
            android:layout_gravity="center_vertical|right"
            android:src="@android:drawable/ic_menu_share" />

        <ImageView
            android:id="@+id/imageView3"
            android:layout_width="25dp"
            android:layout_height="25dp"
            android:layout_gravity="center_vertical"
            android:layout_marginBottom="5dp"
            android:layout_marginLeft="5dp"
            android:layout_marginRight="10dp"
            android:layout_marginTop="5dp"
            android:src="@drawable/setting"
            android:visibility="gone" />

    </RelativeLayout>

    <android.support.v4.widget.DrawerLayout xmlns:android="http://schemas.android.com/apk/res/android"
        android:id="@+id/drawer_layout"
        android:layout_width="match_parent"
        android:layout_height="0dp"
        android:layout_weight="1">

        <!-- Drawer Content -->

        <FrameLayout
            android:id="@+id/content_frame"
            android:layout_width="match_parent"
            android:layout_height="match_parent"
            android:layout_marginTop="10dp" />

        <!-- The navigation menu -->
        <LinearLayout
            android:id="@+id/header"
            android:layout_width="260dp"
            android:layout_height="match_parent"
            android:layout_gravity="left"
            android:background="@color/colorDrawer"
            android:orientation="vertical">

            <ImageView
                android:id="@+id/imageView"
                android:layout_width="wrap_content"
                android:layout_height="50dp"
                android:layout_gravity="top"
                android:paddingLeft="50dp"
                android:paddingRight="50dp"
                android:paddingTop="5dp"
                android:src="@drawable/logo" />

            <TextView
                android:id="@+id/textView2"
                android:layout_width="match_parent"
                android:layout_height="1dp"
                android:background="@color/colorDrawerText" />

            <ExpandableListView
                android:id="@+id/lvExp"
                android:layout_width="match_parent"
                android:layout_height="match_parent"
                android:layout_marginTop="10dp"
                android:background="@color/colorDrawer"
                android:choiceMode="singleChoice"
                android:groupIndicator="@android:color/transparent"
                android:listSelector="@color/themeColor"></ExpandableListView>

        </LinearLayout>

    </android.support.v4.widget.DrawerLayout>
</LinearLayout>

    <!--android:groupIndicator="@null"-->

This is done going through the androihive.com tutorial - "ExpandableListView example" =============Link for your reference is http://www.androidhive.info/2013/07/android-expandable-list-view-tutorial/
Vinod Kumar Gaur
相关问题
最新问题
- 我写了这段代码,但我无法理解我的错误
- 我无法从一个代码实例的列表中删除 None 值,但我可以在另一个实例中。为什么它适用于一个细分市场而不适用于另一个细分市场?
- 是否有可能使 loadstring 不可能等于打印?卢阿
- java中的random.expovariate()
- Appscript 通过会议在 Google 日历中发送电子邮件和创建活动
- 为什么我的 Onclick 箭头功能在 React 中不起作用?
- 在此代码中是否有使用“this”的替代方法?
- 在 SQL Server 和 PostgreSQL 上查询,我如何从第一个表获得第二个表的可视化
- 每千个数字得到
- 更新了城市边界 KML 文件的来源?