iOS内容从水平到垂直与动画,反之亦然
我们可以通过UIStackView最初的垂直轴实现这一目标,然后最终它将是水平轴,反之亦然?
如果使用NSAutoLayout,如何做到这一点?
如果有人可以提供我的示例来源或任何提示,这需要帮助。
2 个答案:
答案 0 :(得分:4)
更新答案
感谢@Fogmeister
Frist我做两个StackViews 一个持有namelable和profileImage
和bigStackView保持第一个stackView和followButton

这样的约束
<强> BigStackView:

我在左右添加20点的原因是因为如果我将其设为0,则跟随按钮将接近屏幕边缘!
<强> StackView: 你不需要在这个stackView上添加约束
<强> profileImage:

<强> NameLable:

<强> FollowImage:

然后我向下滚动
时使两个间距相等,间距为5但是当向上滚动时,StackView的间距将是15,因此配置文件图像将远离nameLable(这就是我添加两个stackViews以便我可以控制间距的原因)
并且还将160h的hight约束添加到stackView 并向上滚动时将其更改为100磅
代码将变为这样
import UIKit

class ViewController: UIViewController , UITableViewDelegate , UITableViewDataSource {

    @IBOutlet weak var bigStackView: UIStackView!

    @IBOutlet weak var StackView: UIStackView!

    @IBOutlet weak var StackViewHight: NSLayoutConstraint!

    @IBOutlet weak var progileHight: NSLayoutConstraint!

    @IBOutlet weak var profileWidth: NSLayoutConstraint!


    var rowsNames = ["Row 0", "Row 1", "Row 2", "Row 3", "Row 4", "Row 5",
                  "Row 6", "Row 7", "Row 8", "Row 9", "Row 10", "Row 11",
                  "Row 12", "Row 13", "Row 14", "Row 15", "Row 16", "Row 17",
                  "Row 18", "Row 19", "Row 20", "Row 21", "Row 22", "Row 23",
                  "Row 24", "Row 25", "Row 26", "Row 27", "Row 28", "Row 29", "Row 20"]


    // we set a variable to hold the contentOffSet before scroll view scrolls
    var lastContentOffset: CGFloat = 0


    override func viewDidLoad() {
        super.viewDidLoad()


    }


    // MARK: - UITableViewDataSource


    func tableView(_ tableView: UITableView, numberOfRowsInSection section: Int) -> Int {
        return rowsNames.count

    }

     func tableView(_ tableView: UITableView, cellForRowAt indexPath: IndexPath) -> UITableViewCell {
        let cell = tableView.dequeueReusableCell(withIdentifier: "Cell", for: indexPath)

        cell.textLabel?.text = rowsNames[indexPath.row]

        return cell
    }


    // this delegate is called when the scrollView (i.e your UITableView) will start scrolling
    func scrollViewWillBeginDragging(_ scrollView: UIScrollView) {
        self.lastContentOffset = scrollView.contentOffset.y
    }

    // while scrolling this delegate is being called so you may now check which direction your scrollView is being scrolled to
    func scrollViewDidScroll(_ scrollView: UIScrollView) {
        if (self.lastContentOffset < scrollView.contentOffset.y) {
            // moved to top


                    UIView.animate(withDuration: 0.5,
                                   animations: {


// Change Hight and Witdh of profileImage (make it smaller)

                                    self.progileHight.constant = 50
                                    self.profileWidth.constant = 50

                self.bigStackView.axis = .horizontal

                                    self.StackView.axis = .horizontal

                                    // Change spacing between profileImage and nameLable
                                    self.StackView.spacing = 15

                                    // Make BigStackView Smaller
                                    self.StackViewHight.constant = 100


                                    self.view.layoutIfNeeded()


                    })


        } else if (self.lastContentOffset > scrollView.contentOffset.y) {
            // moved to bottom

            UIView.animate(withDuration: 0.5,
                           animations: {


                            // return Hight and Witdh of profileImage to its orginal size

                            self.progileHight.constant = 100
                            self.profileWidth.constant = 100


                            self.bigStackView.axis = .vertical

                            self.StackView.axis = .vertical

                            // return spacing between profileImage and nameLable to the orginal space
                            self.StackView.spacing = 5

                            // return BigStackView to its orginal size
                            self.StackViewHight.constant = 160


           self.view.layoutIfNeeded()

                             })

        } else {
            // didn't move
        }
    }


}
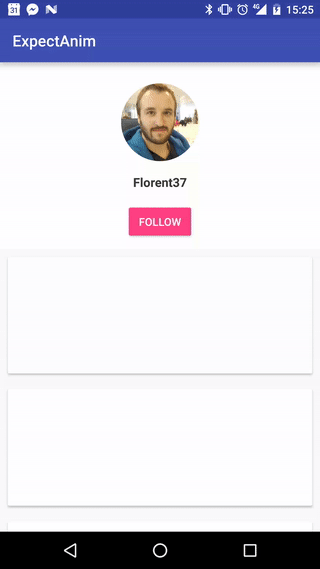
结果将是:

旧答案:
我认为你无法通过UIStackView实现这一目标
但使用UIView
很容易做到这一点frist让你的StoryBoard像这样


然后添加约束
UIView:

<强> profileImage:

<强> nameLable:

<强> followButton:

我在每台iPhone设备和iPad上都进行了测试,约束并没有中断
然后你只需要使用UIView.animate
并移动项目
代码就像这样
import UIKit

class ViewController: UIViewController , UITableViewDelegate , UITableViewDataSource {

    var rowsNames = ["Row 0", "Row 1", "Row 2", "Row 3", "Row 4", "Row 5",
                  "Row 6", "Row 7", "Row 8", "Row 9", "Row 10", "Row 11",
                  "Row 12", "Row 13", "Row 14", "Row 15", "Row 16", "Row 17",
                  "Row 18", "Row 19", "Row 20", "Row 21", "Row 22", "Row 23",
                  "Row 24", "Row 25", "Row 26", "Row 27", "Row 28", "Row 29", "Row 20"]


    @IBOutlet weak var squareView: UIView!

    @IBOutlet weak var hightView: NSLayoutConstraint!


    @IBOutlet weak var profileImage: UIImageView!

    @IBOutlet weak var followButton: UIButton!

    @IBOutlet weak var nameLable: UILabel!

    // we set a variable to hold the contentOffSet before scroll view scrolls
    var lastContentOffset: CGFloat = 0


    override func viewDidLoad() {
        super.viewDidLoad()


    }


    // MARK: - UITableViewDataSource


    func tableView(_ tableView: UITableView, numberOfRowsInSection section: Int) -> Int {
        return rowsNames.count

    }

     func tableView(_ tableView: UITableView, cellForRowAt indexPath: IndexPath) -> UITableViewCell {
        let cell = tableView.dequeueReusableCell(withIdentifier: "Cell", for: indexPath)

        cell.textLabel?.text = rowsNames[indexPath.row]

        return cell
    }


    // this delegate is called when the scrollView (i.e your UITableView) will start scrolling
    func scrollViewWillBeginDragging(_ scrollView: UIScrollView) {
        self.lastContentOffset = scrollView.contentOffset.y
    }

    // while scrolling this delegate is being called so you may now check which direction your scrollView is being scrolled to
    func scrollViewDidScroll(_ scrollView: UIScrollView) {
        if (self.lastContentOffset < scrollView.contentOffset.y) {
            // moved to top

                    self.hightView.constant = 100


                    UIView.animate(withDuration: 0.5,
                                   animations: {


                 self.profileImage.transform = CGAffineTransform(translationX:-150, y: -15).scaledBy(x: 0.5, y: 0.5)


                 self.followButton.transform = CGAffineTransform(translationX:130, y: -110)

              self.nameLable.transform = CGAffineTransform(translationX:-95, y: -80)


                                    self.view.layoutIfNeeded()


                    })


        } else if (self.lastContentOffset > scrollView.contentOffset.y) {
            // moved to bottom

            UIView.animate(withDuration: 0.5,
                           animations: {

            self.hightView.constant = 206
            self.profileImage.transform = CGAffineTransform.identity
            self.followButton.transform = CGAffineTransform.identity
            self.nameLable.transform = CGAffineTransform.identity

            self.view.layoutIfNeeded()

                             })

        } else {
            // didn't move
        }
    }


}
我所做的是检测用户是否向上或向下滚动
向上滚动
我改变了UIView的高度 更改ProfileImage的位置,使其缩小一半 然后更改namaLable和followButton
当它向下滚动时 我将高度尺寸恢复为原始尺寸 并使用
将其余视图恢复为原始大小CGAffineTransform.identity
结果是

我希望这个解决方案适合您
答案 1 :(得分:3)
我以为我会使用UIStackView添加一个答案,因为您似乎已经在没有尝试的情况下解雇了它。
我在这里添加了一个包含所有代码的要点。代码有点狡猾,95%的代码都是设置Playground页面和视图等......
https://gist.github.com/oliver-foggin/7ef9e2b7f77b733ea0afb782d7c7d7e0
我花了大约10分钟。
看着你的动画,我注意到只有三件事在发生变化。圆形视图的大小,圆形视图的圆角半径和布局的轴(垂直/水平)。
这反映在我的示例中使用的动画代码中......
UIView.animate(withDuration: 0.5) {
    stackView.axis = .horizontal
    roundViewHeightConstraint.constant = 60
    roundView.layer.cornerRadius = 30
}
这导致以下动画(可以调整以改进它,但我没有太多时间来写这个)...

稍微更新了代码以尝试改进动画......
stackView.axis = .horizontal
roundViewHeightConstraint.constant = 60

UIView.animate(withDuration: 0.5) {
    containerView.layoutIfNeeded()
}
新动画......

圆角半径在图层上没有正确的动画效果。那是因为我使用的是UIView而不是你原版中的UIImageView。使用UIImageView,你不会像我一样改变角落半径。只需使用圆角图像。
- 我写了这段代码,但我无法理解我的错误
- 我无法从一个代码实例的列表中删除 None 值,但我可以在另一个实例中。为什么它适用于一个细分市场而不适用于另一个细分市场?
- 是否有可能使 loadstring 不可能等于打印?卢阿
- java中的random.expovariate()
- Appscript 通过会议在 Google 日历中发送电子邮件和创建活动
- 为什么我的 Onclick 箭头功能在 React 中不起作用?
- 在此代码中是否有使用“this”的替代方法?
- 在 SQL Server 和 PostgreSQL 上查询,我如何从第一个表获得第二个表的可视化
- 每千个数字得到
- 更新了城市边界 KML 文件的来源?